Gradleでマルチプロジェクト
マルチプロジェクトについて
マルチプロジェクトとは
複数の子プロジェクトを内部に保持するプロジェクトのことを指します。マルチプロジェクトを用いることで、1つのプロジェクトを更に細かい粒度で分割することが可能になります。
マルチプロジェクトの使い所
以下参考サイトを見ると、リリースタイミングが同じプロジェクトをマルチプロジェクトとして管理するのが良い様です。
つまり、変更理由が同じプロジェクトは、マルチプロジェクトとして1つにまとめる。一方で、変更理由が異なるプロジェクトは、個別プロジェクトとして扱う。ということになるかと思います。
参考サイト
https://discuss.gradle.org/t/multiproject-vs-composite-what-to-choose/20581/2
If two things have the same version and release cycle, then they should be in a multi-project build. If they are independent of each other, they should be in independent builds.
gradle - Do composite builds make multi-module builds obsolete? - Stack Overflow
In my opinion, a multi-module build is a single system which is built and released together. Every module in the build should have the same version and is likely developed by the same team and committed to a single repository (git/svn etc).
実装例
以下サイトを元に実装を行います。
Spring Boot 入門 | マルチモジュールプロジェクトの作成 - コードサンプル
完成版のコードに関して、以下に配置しています。
GitHub - U0326/code-example-gradle-multi-project
実装手順
libraryとそれを呼び出すapplicationを小プロジェクトとして持つ、親プロジェクトを以下手順で作成します。
親プロジェクトの作成
任意の場所で、以下コマンドを発行します。
mkdir multi_module
cd multi_module
touch settings.gradle
上記で作成したsettings.gradleに、以下内容を記載します。include()でマルチプロジェクトに含める子プロジェクトを指定します。
rootProject.name = 'gs-multi-module'
include 'library'
include 'application'
libraryプロジェクトの作成
https://start.spring.io
上記サイトで下図の通り入力を行い、ベースとなるプロジェクトを作成します。

作成したlibraryフォルダをmulti_moduleフォルダに配置し、以下コマンドを発行します。
cd "multi_moduleフォルダのパス"
cd library
mv gradlew* gradle ..
rm -rf src/main/java/com/example/multimodule/library
rm -rf src/test/java/com/example/multimodule/library
mkdir src/main/java/com/example/multimodule/service
libraryの実行可能jarを生成させない為に、libraryフォルダ内のbuild.gradleに以下内容を追記します。
bootJar {
  enabled = false
}

jar {
  enabled = true
}
./src/main/java/com/example/multimodule/service配下に以下Javaソースを配置します。
package com.example.multimodule.service;

import org.springframework.boot.context.properties.EnableConfigurationProperties;
import org.springframework.stereotype.Service;

@Service
@EnableConfigurationProperties(ServiceProperties.class)
public class MyService {

  private final ServiceProperties serviceProperties;

  public MyService(ServiceProperties serviceProperties) {
    this.serviceProperties = serviceProperties;
  }

  public String message() {
    return this.serviceProperties.getMessage();
  }
}
package com.example.multimodule.service;

import org.springframework.boot.context.properties.ConfigurationProperties;

@ConfigurationProperties("service")
public class ServiceProperties {

  /**
   * A message for the service.
   */
  private String message;

  public String getMessage() {
    return message;
  }

  public void setMessage(String message) {
    this.message = message;
  }
}
applicationプロジェクトの作成
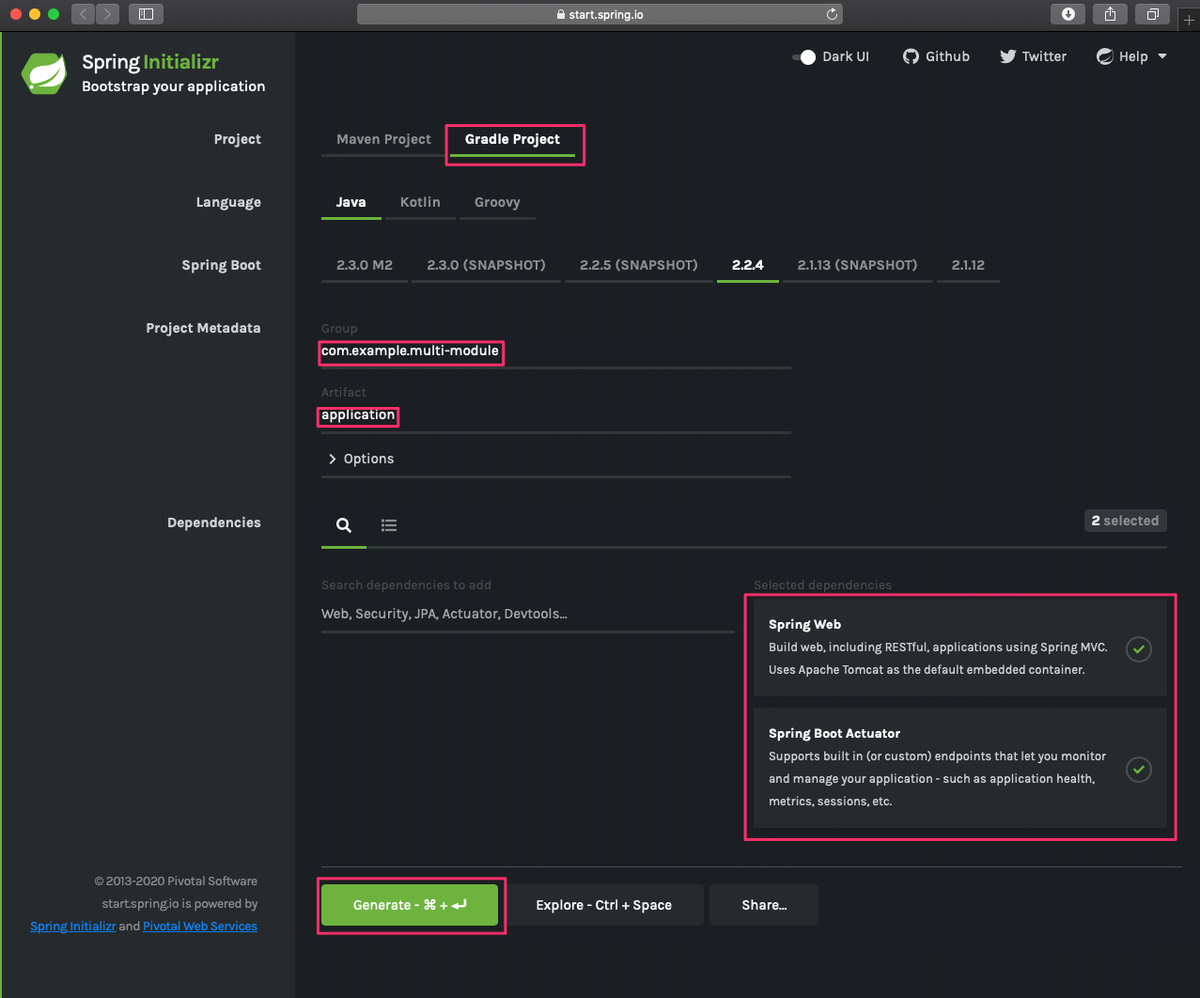
https://start.spring.io
上記サイトで下図の通り入力を行い、ベースとなるプロジェクトを作成します。

作成したapplicationフォルダをmulti_moduleフォルダに配置し、以下コマンドを発行します。
cd "multi_moduleフォルダのパス"
cd application
rm -rf gradlew* gradle
rm src/main/java/com/example/multimodule/application/Application.java
touch src/main/resources/application.properties
上記で作成したapplication.propertiesに以下内容を記載します。
service.message=Hello, World
applicationフォルダ内のbuild.gradleのdependencies内に以下内容を追記します。project()を用いて、マルチプロジェクト内の別プロジェクトを参照します。
implementation project(':library')
./src/main/java/com/example/multimodule/application配下に以下Javaソースを配置します。
package com.example.multimodule.application;

import com.example.multimodule.service.MyService;
import org.springframework.boot.SpringApplication;
import org.springframework.boot.autoconfigure.SpringBootApplication;
import org.springframework.web.bind.annotation.GetMapping;
import org.springframework.web.bind.annotation.RestController;

@SpringBootApplication(scanBasePackages = "com.example.multimodule")
@RestController
public class DemoApplication {

  private final MyService myService;

  public DemoApplication(MyService myService) {
    this.myService = myService;
  }

  @GetMapping("/")
  public String home() {
    return myService.message();
  }

  public static void main(String[] args) {
    SpringApplication.run(DemoApplication.class, args);
  }
}
実行結果
以下の通り親プロジェクト上でコマンドを一括で発行します。
cd "multi_moduleフォルダのパス"
./gradlew build
./gradlew :application:bootRun
http://localhost:8080にアクセスすると以下画面が表示されます。
